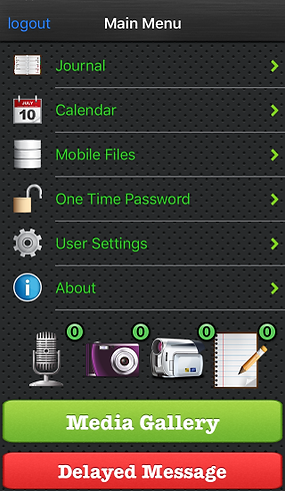
The Media Gallery can be accessed from the main menu but pressing the large green Media Gallery button.
iOS Mobile App Media Gallery
|
Here you'll see all of the memories (media items) you've created using the mobile app.

You can change the month being viewed by using the left and right arrows at the top of the screen. Your memories are organized by date from oldest to newest as you scroll down the screen. Each row represents a different day.
If, for a particular day, more memories were created than can be displayed, swipe left and right to scroll through them. You can also tap the right arrow on the right side of the screen to view all of the memories created that day on one screen.


You can change the display to show only photos or videos using the filter controls located at the bottom of the screen.

Swipe left and right to view all of the memories for a given day
Selected day view displays all of your memories created on a particular day.
Pressing the Upload button on the day view of your memories causes all of the memories for the selected day to be sent to your account on the iMemorized server. You will be asked where you would like to send your memories. If you're not sure, your Inbox is a good default location. If you only want to upload individual memories see help for Saving Your Memories to the Server.
Display only photo memories
Display only video memories
Upload all memories for the selected day
The status of your memory changes as its uploaded to the iMemorized server
After uploading your memories to the iMemorized server you have the option of deleting them from your mobile device
From the Selected Day Memories screen, used to view all of your memories for a particular day, you will see red and green circles at the bottom right of each memory thumbnail. These symbols indicate whether or not the memory has been uploaded to your account on the iMemorized server. A red 'X' symbol indicates that it has not been sent to the server while a green checkmark symbol indicates that it has.
Display Controls
Uploading All Memories to the iMemorized Server
To view the details about a memory, tap on it to open the Details screen.
Memory Details

From this screen you can see information about a memory such as the date, time and location it was created, its file size and upload status. You can also view a full screen image of photo memories or playback videos and audio recordings by clicking on the preview image at the top of the screen.


Use the red circle in the bottom left area of the screen to delete the memory from your device. The map button in the bottom center of the screen provides a full screen view of where the memory was created. And lastly, the envelope icon in the bottom right can be used to save your memory to the iMemorized server as described in the help for Saving Your Memories to the Server.
Tap on the memory preview to open a full screen view

Tap on the Share button in the bottom left area of the screen to open the sharing options window.
Tapping on the preview image for an audio or video memory will open a media player window.

Tap on the red circle in the bottom left area of the screen to delete the memory.

Tap on the map button in the bottom center area of the screen to view a full screen map of where the memory was created.

Press the Select button in the top right area of the screen to enter select mode. Tap any number of memories to select them. You then have the option of deleting or uploading all of the memories you've selected to the iMemorized server (for more information on uploading your files see the section 'Uploading All Memories to the iMemorized Server').
Select any number of memories in selection mode.